
Designing Watercolor Genre Signs in Canva
I decided this summer that it was time to overhaul my library genre signs. We have signage in place, but you can't read the labels from across the library, and they're just words - no images to support the text.

I'm going to use the signs with genre descriptions for book selection activities in my library.
The first thing you're going to need is a Canva account, preferably a Pro account or an Education account so you have access to ALL the clipart. Then I created a custom size design with dimensions of 8.5" x 11".


Continue to add images and play with filters until you're happy with the design. Then it's time to add the text. Click on the "Text" option on the left-hand menu, then click on "Add a Heading."


The last technique you'll need is adding a semi-transparent rectangle behind the text. Click on "Elements" in the left-hand menu, and select "Square" from underneath the search box.


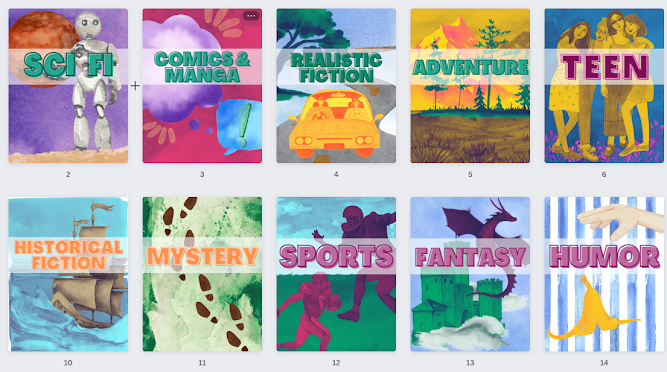
I looked for pre-made genre signs, but everything felt elementary or boring, and I was looking for something with a little more style. To meet my needs, I ended up creating a set of my own genre posters for the following 15 sections: horror, sci fi, comics & manga, realistic fiction, adventure, teen, thriller, poetry, romance, historical fiction, mystery, sports, fantasy, humor, and classics.
If you're short on time, and you want to purchase these pre-made genre signs as a printable PDF file, they're in my TPT store. The PDF gives you access to 15 different genres, along with a second set of signs that includes a description of the genre on each sign, for a total of 30 signs. Here's what the signs look like with added genre descriptions:
I'm going to use the signs with genre descriptions for book selection activities in my library.
If you want to create your own genre signs, keep reading for directions.
Next, you'll need to find the clip art you'd like to use. Click on "Elements" then enter your search term, along with the word "watercolor" in the search box. Click on the image you want to add it to your design.
Now we want to give the image a fun pop of color. To do this, make sure the image is selected, then we're going to click the option to "Edit Image" in the top menu, and you'll scroll down on the left-hand side until you see "Duotone." Click on "See All" to start playing with the filter.
Select the color you like best, then click "Apply" at the bottom to change the image (don't worry, you can always go back and make a new selection, or remove the filter entirely).
Continue to add images and play with filters until you're happy with the design. Then it's time to add the text. Click on the "Text" option on the left-hand menu, then click on "Add a Heading."
Click on the text you've added, and type in the name of the genre. Then, with the text selected, click on "Effects." There are lots of styles to choose from, but I went with "Splice." You can also tweak the color, which I've done.
Click on the square (1), then click and drag the small rectangles to change the dimensions as desired (2). You can also change the color (3).
The last thing you'll want to do is change the transparency, so the image behind shows through. With the rectangle selected, click on the three dots in the top menu (1). Then click on the transparency button (2), and on the new menu, you can use the slider or the value box to make it more or less transparent (3).
That's it for technique! When you're happy with your final design, download as a PDF and print!


Comments
Post a Comment